New Archive Click Fraud Alerts
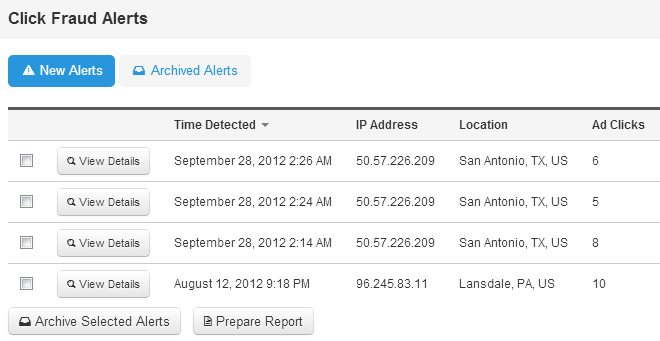
You can now keep track of which click fraud alerts you’ve already read and requested refunds for by archiving them. Simply check the box next to each alert you want to archive and press the Archive Selected Alerts button to move them from the New Alerts to Archived Alerts page.
New Prepare Combined Reports
To make reporting suspected click fraud to your advertising networks easier, you can now automatically prepare a combined report from multiple fraud alerts. Check the box next to each alert you want to include and click the Prepare Report button. You’ll be sent a text file with all the details needed to investigate the multiple click fraud incidents Improvely alerted you to.

If you use WooCommerce, the open-source eCommerce plugin for WordPress, adding Improvely to your online store just became easy as clicking “Install Now” in your WordPress dashboard:
Download our new Improvely for WooCommerce WordPress Plugin from the WordPress Plugin Directory, or search for Improvely from the plugins page of your WordPress dashboard.

Without making any changes to your theme, Improvely will automatically begin keeping track of the traffic to your site and the source of every purchase made in your store. All of the reports, split testing tools, click fraud monitoring and other benefits of Improvely will be just a click away from the WordPress dashboard you already use to manage your store.
Add Improvely to your Shopify store in just a few clicks with our new Shopify App. This app will automatically integrate Improvely with your store, sending information about visits and purchases to Improvely without manually adding code to your theme.

With Improvely, you’ll learn what sites, searches and ads are driving traffic to your store, and which are responsible for each purchase.
To get started, click here to add the app to your store.
New Import 7Search Reports
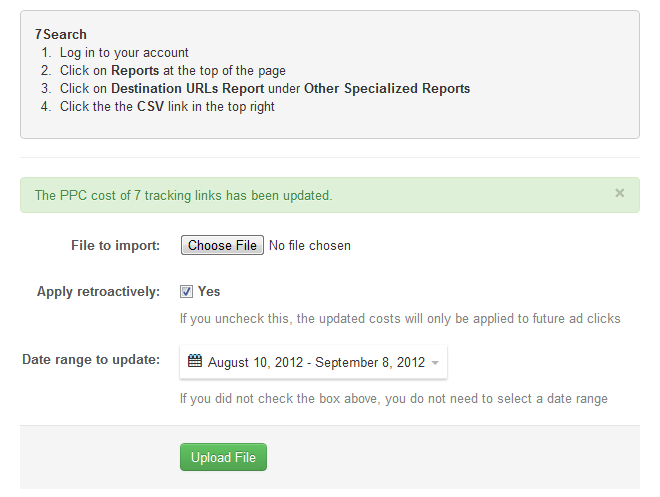
You can now automatically update your Improvely reports with the actual cost of clicks from 7Search ads by importing a report from your 7Search account. You’ll find the new option in the Import PPC Cost Report link in your Tools menu.

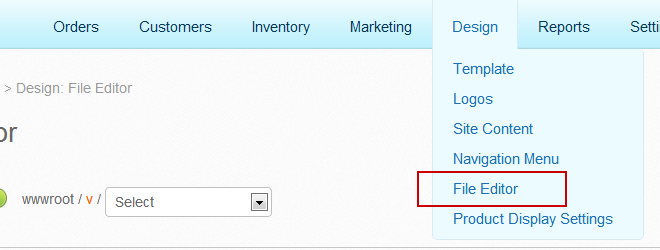
First, log in to your Volusion Dashboard. Then, click on the Design menu and choose File Editor —

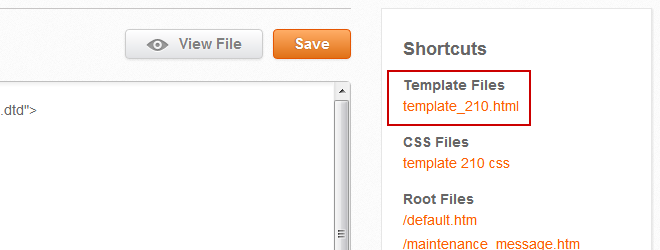
In the right column, click the first link listed under Shortcuts to choose your active template file.

Scroll to the bottom of the editor area to where you see the </body> tag. Right above that, paste the following code:
<script type="text/javascript" src="https://yoursite.iljmp.com/improvely.js"></script>
<script type="text/javascript">
  improvely.init('yoursite', 1);
  if (typeof Order[0] !== 'undefined')
    improvely.goal({
      type: 'sale',
      amount: Order[2],
      reference: Order[0]
    });
</script>
You now need to make two small changes to that snippet, as the code above is an example not specific to your site.
- In the first and third lines, change “yoursite” to the name of your Improvely site. If you log in at joe.improvely.com, delete “yoursite” and write “joe” in its place.
- In the third line, replace the number “1” after “yoursite” with the number from your Improvely Code.
The 3 things to change are highlighted below —

In your Improvely account, you can find the number to use for step 2 by clicking Project Settings then Get Website Code. Your Project ID in the top right corner of the page is the number you need.
That’s it! Press the Save button in your Volusion site to save the changes to your template. Improvely will now track all the visits and purchases at your store, and tell you the exact traffic source of each new customer.


